
Pick Whiteout Window Film With Near 1% VLT: DIY or Hire a Pro
Whiteout window film turns glass into a permanently opaque white panel, giving complete 24/7 privacy and strong light blocking. It’s the right call when you need total visual privacy and don’t mind losing the view. The tradeoff is real: no daylight, no glimpse outside, and once a permanent adhesive film goes up, it’s a commitment. For a single small window, a removable roll is a fine DIY project. For storefronts, large panes, or anything you want backed by a warranty, hire a professional installer.
TL;DR:
- Whiteout film blocks nearly 100% of visible light, with some options reaching below 1% VLT, providing total privacy at the expense of daylight and outside view.
- Thicker PET polyester films resist scratches and cracking, with UV rejection often exceeding 99% and some products rejecting over 70% of solar heat.
- DIY installation is feasible for small windows but challenging for large or multiple panes, where professional installers ensure precision, warranty coverage, and better durability.
- Whiteout film is best suited for spaces prioritizing privacy over light, including bathrooms, storage rooms, and certain retail areas, while alternatives like frosted or perforated films serve different needs.
- For high-stakes or large projects, a professional install with a warranty reduces risks of improper application, bubble formation, or adhesive failure, especially on safety or energy-rated glass.
Table of Contents
- What Should You Compare When Choosing Whiteout Window Film?
- How Do You Read a Whiteout Film Spec Sheet?
- Should You Install Whiteout Film Yourself or Hire a Pro?
- Where Does Whiteout Film Work Best, and What Are the Alternatives?
- Is Whiteout Film Worth It? Weighing the Tradeoffs
- When Is a Warranty-Backed Professional Install Worth the Cost?
- What Does the Process Look Like From Decision to Finished Install?
- An Honest Read on Whiteout Film
- Get Whiteout Film Installed Right the First Time
- Where to Verify the Numbers
- Sources
- FAQ
What Should You Compare When Choosing Whiteout Window Film?
Not all whiteout films are made equal, even though most product pages use nearly identical language. Before you buy a roll or book an installer, run through these checkpoints:
- Opacity/VLT: Check the datasheet for an actual visible light transmission (VLT) number, not just a marketing claim of “100% opaque.” Some SKUs hit near 1% VLT, which is effectively zero visibility in either direction.
- Material and thickness: Most whiteout films use PET polyester rather than PVC, since PET holds up better against yellowing and cracking. Thickness is usually listed in microns or mils. Thicker films resist scratches and handle rough environments better, but they’re also harder to work with during installation.
- UV and solar performance: Look for a UV rejection percentage and, where available, a total solar energy rejected (TSER) or solar heat gain coefficient (SHGC) figure.
- Installation type: Static cling films press onto glass without adhesive and peel off cleanly, which suits renters. Pressure-sensitive and permanent adhesive films last longer but are harder to remove without a professional.
- Warranty coverage: Manufacturer warranties cover the film itself; installer warranties cover the workmanship. Read the exclusions before assuming both apply to fading, peeling, or adhesive failure.
- Sizes and cutting: Standard rolls often run around 48 inches wide, though plotter cutting lets a professional shop custom-fit unusual window shapes.
- Cost structure: Rolls are priced per linear foot or per square foot, and professional installation adds labor on top, usually scaled by the number and size of panes.
How Do You Read a Whiteout Film Spec Sheet?
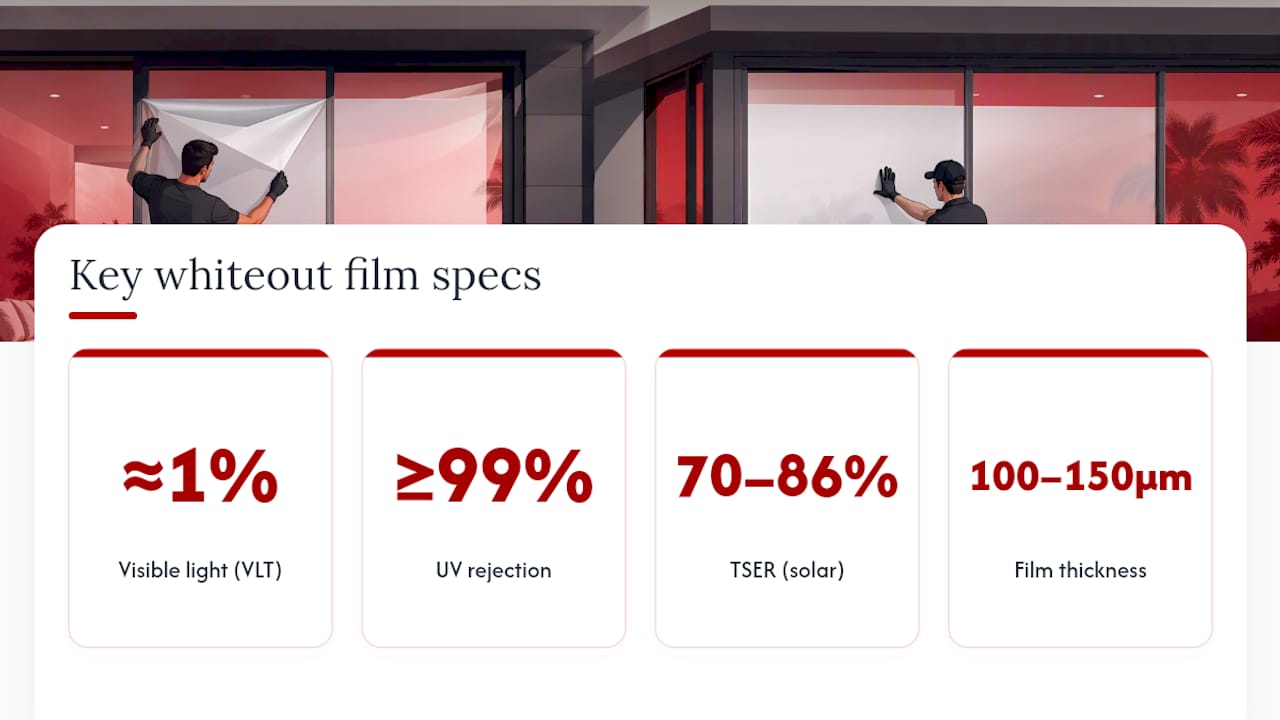
The numbers on a datasheet tell you far more than the phrase “total privacy” ever will. Visible light transmission, or VLT, measures the percentage of light passing through the glass and film combined. Whiteout products aim for near-total blockage, with example datasheets from suppliers like TintFit showing VLT figures around 1%, which is effectively opaque in daylight and at night.
UV rejection matters even though the film blocks visible light entirely. Films with UV rejection at or above 99% protect flooring, furniture, and merchandise from sun damage on the small sliver of exposed glass edges and adjacent surfaces.
Some whiteout films double as solar control products. TSER, or total solar energy rejected, describes how much heat the film keeps out. Supplier data shows some whiteout SKUs reaching TSER figures above 70%, occasionally approaching 86% depending on the glass type behind them, a detail confirmed on product pages from vendors like TintFit. The NFRC publishes the standardized methodology behind VLT and SHGC ratings, which is the benchmark to use when comparing claims across different manufacturers.
On the material side, most whiteout films are PET polyester, typically running somewhere in the 100 to 150 micron range depending on the brand. Thicker film handles storefront abuse better; thinner film is easier to wrap around curved or paneled glass. Finish matters too: a glossy white reflects more interior light back into the room, while a matte finish diffuses it more evenly and shows fewer fingerprints.
Should You Install Whiteout Film Yourself or Hire a Pro?
A single bathroom window is a manageable weekend project. A ten-pane storefront is not. Here’s the basic DIY sequence:
- Measure the glass precisely, accounting for any raised trim or window hardware.
- Cut the film with a sharp blade, leaving a small margin for trimming.
- Wet the glass and the adhesive side of the film with a soapy water solution.
- Apply the film and squeegee out the water and air from the center outward.
- Trim the excess edges with a fresh blade.
- Let the film cure for several days before cleaning the surface.
The most common DIY mistakes are trapped air bubbles from insufficient wetting, applying film in direct sunlight (which causes the adhesive to set too fast), sloppy edge trims that leave gaps, and using the wrong film type on tempered or laminated glass without checking compatibility first. The Glass and Glazing Industry Council publishes guidance on film compatibility with different glass types, worth checking before you commit to any adhesive product on safety glazing.
Pro Tip: Start with the smallest, least visible window in your home first. If you’re going to trap a bubble or misjudge a cut, better it happens on a hall closet window than your storefront’s main display glass.
Hire a professional for large or high windows, commercial storefronts, anything requiring a workmanship warranty, or jobs that combine privacy film with security or safety-rated laminate. Pros bring plotter-cut templates for precision, finish the job faster with two-person crews on wide rolls, and back the install with a warranty that a DIY roll from a hardware store simply won’t offer. A single window might take an hour; a multi-pane storefront can take a full day with a two-person crew.
Where Does Whiteout Film Work Best, and What Are the Alternatives?
Whiteout film earns its keep in spaces where total privacy outranks the view. Manufacturer and retail listings consistently point to the same short list of ideal spots, a pattern echoed on pages like Evowrap’s whiteout film listing:
- Bathrooms and bedrooms facing the street or a neighboring property
- Conference rooms where sensitive conversations happen
- Storage areas and cabinets with glass fronts
- Back-of-house retail spaces and stockrooms visible from the sales floor
If total blackout isn’t actually what you need, other films solve related problems better. Frosted film keeps daylight flowing in while blurring shapes, which works well for a home office door. Blackout film goes darker than whiteout and is built for rooms like theaters or nurseries where light control matters more than aesthetics. One-way or perforated films let you see out during the day while blocking the view in from outside, a good fit for ground-floor storefronts that still want daytime visibility. Decorative films handle branding and interior partitions where privacy is secondary to appearance, an option worth exploring through frosted graphics for offices.
Is Whiteout Film Worth It? Weighing the Tradeoffs
Every material choice involves a compromise, and whiteout film’s tradeoffs are unusually clear cut.
The upside:
- Permanent, round-the-clock privacy with zero visibility in either direction.
- Strong light blocking for glare, screen glare, and unwanted heat
- UV protection for flooring and furnishings near the glass
- A clean, uniform look that hides clutter behind storage glass
The downside:
- Total loss of daylight and outside view, which can make small rooms feel closed in
- Possible need for supplemental interior lighting during the day
- Permanent adhesive films are difficult to remove without professional help
- Some commercial and multi-family buildings have code restrictions on opaque glazing near exits
If permanence worries you, a removable static-cling version solves most of it. Pairing the film with a brighter interior light fixture offsets the daylight loss. And for any application touching egress windows, fire exits, or safety glazing, a quick consultation with a professional installer avoids a code violation down the line.
When Is a Warranty-Backed Professional Install Worth the Cost?
A reputable window film installer with many years of experience shapes a simple rule: the more permanent or higher-stakes the project, the more a warranty matters. A storefront installation that fails in year three because of a cheap adhesive isn’t just an inconvenience, it’s a redo at full cost.
A lifetime warranty on installation means the labor and workmanship behind your film are covered for as long as you own the property, not just the first year when problems are least likely to show up. Partnerships with 3M and LLumar give access to documented datasheets and manufacturer-backed film, rather than an unlabeled roll with no verifiable spec sheet.
Projects that call for a professional install specifically: anything tied to energy performance goals, vandalism-prone storefronts, or safety-rated film that needs to meet a building code standard.
What Does the Process Look Like From Decision to Finished Install?
Buying and installing whiteout film follows a fairly predictable timeline, whether it’s one window or a full storefront.
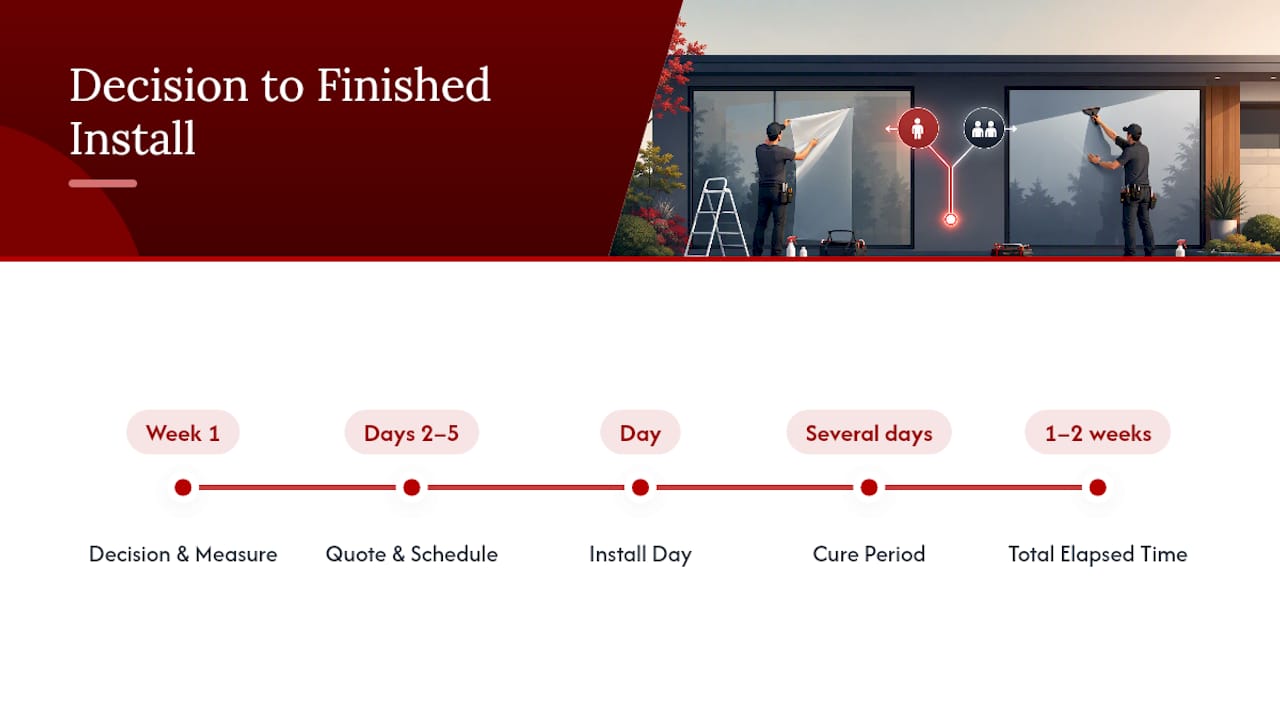
Week one: decision and measurement. Once you’ve settled on whiteout film, measure every pane you plan to cover. For a DIY project, this is also when you order your roll. For a professional job, this is when you request an on-site estimate, since actual glass conditions (tint, coatings, tempered vs. laminated) affect film compatibility.
Days 2 to 5: quote and scheduling. A local installer typically visits within a few days of a request, measures precisely, and provides a written quote covering material, labor, and warranty terms. Commercial jobs with multiple storefronts may need a second visit to confirm access and timing around business hours.
Installation day. A single residential window is usually a same-day job, often finished within an hour or two. Multi-pane commercial storefronts can take a full day or spread across two visits if the crew needs to work around store hours or foot traffic.
Cure time. After installation, most films need several days to fully cure before you clean the surface or expose it to heavy moisture. Professional crews will tell you the exact window for your specific film.
Total elapsed time from decision to a fully cured, finished installation typically runs one to two weeks for a straightforward residential job, longer for large commercial projects requiring custom plotter-cut panels.
An Honest Read on Whiteout Film
Whiteout film delivers exactly what it promises: total privacy, no exceptions. Where people get tripped up is treating it as a default choice when what they actually want is daylight with privacy, which calls for frosted or one-way film instead. For genuine full-blackout needs on permanent glass, measure your openings and request an on-site estimate. For a single small window, a removable roll is a reasonable place to start.
— Jake
Get Whiteout Film Installed Right the First Time
Some professional installers offer privacy and decorative films for homes and businesses in Southern California, sometimes backed by a lifetime warranty on installations. Such warranties matter most on the projects this guide flagged as pro-install territory: storefronts, permanent residential glass, and anything where a redo years later would cost more than doing it right the first time.

As a partner shop for 3M and LLumar, Twtwindowfilm works with documented, manufacturer-backed film rather than unlabeled rolls with no verifiable spec sheet. Estimates are free and on-site, so measurements and glass compatibility get checked before any film gets ordered. If you’ve got a storefront, office partition, or a full house of windows that need real privacy, request an on-site estimate and get a quote based on your actual glass, not a generic roll price.
Where to Verify the Numbers
For film specs and definitions, check the NFRC for standardized VLT and SHGC methodology, glass.org for glazing safety guidance, and Madico’s White Out datasheet for a representative manufacturer spec sheet.
Sources
FAQ
Is there a window film that lets you see out but not in?
Yes. One-way or perforated films allow visibility outward during daylight while blocking the view from outside, unlike whiteout film, which blocks visibility completely in both directions at all hours.
What are the downsides of using window film?
The main drawbacks with opaque films are the total loss of outside view and natural daylight, potential need for extra interior lighting, and the difficulty of removing permanent adhesive versions without professional help.
What is the best blackout film for windows?
Blackout film and whiteout film both eliminate visibility, but blackout finishes tend to run darker and are built for rooms needing maximum darkness, like media rooms, while whiteout gives a bright white opaque finish suited to privacy in bathrooms, offices, and storefronts.
How do you white out a window?
Measure the glass, cut a whiteout film panel with margin for trimming, wet the glass and adhesive with a soapy water solution, apply and squeegee out air and water, then trim the edges and let the film cure for several days; for large or commercial windows, a professional installer with plotter-cut templates gets a cleaner result backed by a warranty.